Monday, 2 March 2015

Get Moto X like Active Notifications On Any Android Phone


In this Article i will be showing you how to get Moto X like “Active Notifications” on your android phones. It works substantially better for devices with AMOLED or Super AMOLED screens but does work for other screens as well.  This feature shows notifications on the screen when the screen is turned off by only lighting up a small portion of the screen as to prolong battery life exponentially.  This feature can be fully customized by the user in many different ways such as the applications that notifications will be shown as well as how long the notifications are shown on screen before the screen times out again as well as many other different features.  This feature is fairly simple to set up but I will still show the process in a bit more detail for those of you that would like to understand the settings a little better before “unlocking” this feature.


Now in order to use this new feature we must utilize a special application called DynamicNotifications by Great Bytes Software.  This application can be downloaded for free directly from the Google Play Store.  For those of you that are having trouble locating the correct application in the Google Play Store I’ll leave a link below to direct you to the correct application.  Once you have DynamicNotifications by Great Bytes Software downloaded and installed on your Android device you will need to allow the application to have notification access.  This just simply means you will need to allow DynamicNotifications to have access to your notifications so they can be shown as an active notification.  To do this just open the application and if this is the first time starting the app a dialog box will automatically appear stating that you will need to allow notification access.  Just press the “OK” button and a screen will appear showing the notification access settings of your device.  On this screen you will see the DynamicNotifications application listed with an empty box to the right of it, just check that box and another dialog box will appear asking if you wish to allow notification access to DynamicNotifications so press “OK”.  Now the application will have access to the notifications on your Android device so they can be shown as an active notification.

DynamicNotifications Download Here


After you allow notification access to DynamicNotifications you can start customizing the settings anyway that you want.  You will be able to change the applications that you want to show active notifications for simply by changing what apps are on the “manage blocked apps” list.  Just uncheck the applications that you wish to block the active notifications for.  The user is also able to change the amount of time they wish the screen to stay on before it shuts off.  Now by default it is set to whatever amount of time is set in the devices settings for screen delay but this can simply be changed by checking “custom screen timeout” and allowing “device administrator” rights to the application so you can change the amount of time after an active notification is displayed until the screen times out.  The color and background of the active notifications can be changed as well with the “advance display appearance” options.  There you can change all the appearance settings like background, color, etc.  There are also lots of more advance settings that can be changed as well but these settings are only available in the paid version of this application.


After you customize DynamicNotifications than its all set up!!  Nothing left but to enjoy your new active notifications, a feature that is available on newer Android devices.  This feature makes your notifications more battery efficient when the screen is locked or off not to mention the minimalistic look is pretty sleek in my opinion.  Not only is it a way to prolong battery life but also a way to simply customize your Android device so you can show off your new active notifications feature!!                   


Unlock Your Android Phone & Get Tonnes Cool New Features!


We all known that all the newest Android devices have the best and most convenient new features while all the other somewhat older devices are forgotten about as their updates cease to continue from the manufacturer so consumers that wish to use these new features are forced to go out and purchase a newer, usually pricey, high-end Android device.  Well now you can “UNLOCK” some of these new features on your own Android device without having to upgrade to a newer, expensive, device. 
In this article I will be showing Android users how to “UNLOCK” several different new features, that are available on the newest Android devices, on their somewhat older Android devices.  These features don’t even require root permissions from the user so for those of you that are unable or unwilling to root your devices you can still “UNLOCK” these new features for your Android devices as well !!

Click Here to Continue...

Sunday, 8 June 2014

How To Block Ads In Android Apps, Games And Browsers

Ads are a necessary evil. Many websites and applications are providing you with free service, free content and free software because someone else is paying them to keep them up. Thus, the service provider has to serve ads to you in return for the income that is keeping them in business, and in development. As the user, you reap the benefit of using the product for free.


However, sometimes the ad placements can be really annoying, contributing to not-so-appealing user experience. In this post we will look at methods to block ads from showing up on Android. You can block ads from appearing in apps and games, or only on browsers.

The methods here may work for both rooted and non-rooted devices. It will be specified for each method. Before we begin, you need a File Manager, e.g. Astro File Manager. Any other file manager will work fine.

Disclaimer: Attempt ad-blocking at your own risk. We cannot be held responsible for any effects on your device resulting from these methods.


1. Adblock Plus (ABP)

This method uses ad-blockers (apps) to block all ads in your device, including the ads shown in various apps and games. There are many ad-blockers for Android, thanks to the ever-growing Android developers. The top two would be Adblock Plus (ABP) and AdAway; we wil discuss the former, but you can install AdAway if that’s your preference.


Using Adblock Plus

We’re going with Adblock Plus as it is an open source project and has the option to allow non-intrusive ads. This method works for both rooted and non-rooted devices. Installing an ad-blocker app requires your device to allow applications from unknown sources.

Sideloading is required as Google has removed ad-block apps from Google Play Store. You need to sideload any ad-blocker, i.e. install ad-blockers using its APK file and not from Google Play Store.

Follow the given steps to set this configuration:

Go to Settings > Applications (or Security on 4.0 and above) on your Android device.
Navigate to the Unknown sources option.
If unchecked, tap the checkbox, and then tap OK on the confirmation popup.
Your Android device is ready to install ad-blockers.


Installing And Configuring Adblock Plus

1. Open a browser in your device and download Adblock Plus for Android. Your device will receive the APK file: adblockplusandroid-version.apk.

2. Navigate to where your downloaded files are kept, then tap on the file and install. (If you open the APK file using a file manager, select Open App Manager and then click on Install.)

3.1 On rooted devices: after installing, open Adblock Plus. It will request for super user permissions. Allow super user permissions to Adblock Plus and you are good to go.

3.2 On non-rooted devices: you need a few more steps, to manually set up proxy in your Android. You will need to follow the instructions here as instructions are different for Android versions up to 3.1 and 4.0+.s

Now Adblock Plus will start blocking ads. You can set more options in Adblock Plus like ads filter lists, non-intrusive ads, etc in Settings.


Adblock Plus – Browser Extension

Adblock Plus is also available as a browser extension for Firefox. With this method, only the ads shown on web pages inside the browser are blocked. Ads in apps or games are not affected. This method works for rooted as well as non-rooted devices.


Setting Up Adblock Plus (Extension)

1. If you are not using Firefox as a browser on your Android yet, get it here. Run the browser on your device and go to the Adblock Plus add-on here. Add it to Firefox and Install it.

2. Restart Firefox and browse ad-free. You can set more options in Adblock Plus by going to the Menu > Adblock Plus and going through the options you can configure.

2. Block Ads Using ‘Hosts’ File
This method uses ‘hosts’ file to block ads. This method blocks all ads in your device, including the ones shown in various apps and games. This method works only for rooted devices.


What Is A ‘Hosts’ File?

hosts’ file is a plain-text file in an operating system to map hostnames (like anything.com) to its IP address. Whenever you try to launch a website using its hostname, the operating system will usually search the ‘hosts’ file to find the corresponding IP address first.

If the search is successful, then its mapped IP address is used; otherwise a query is sent to DNS (Domain Name Service) to find the IP address of that hostname.


Setting Up ‘Hosts’ File

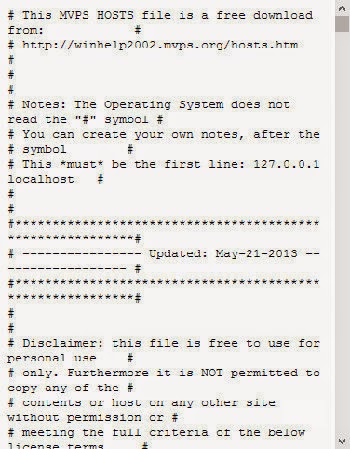
1. On the computer, open MVPS (or pgl.yoyo.org or hostfile.mine.nu) on your browser. A plain-text page will open. Save this page as the name hosts in the computer.


2. Using Bluetooth or a USB connection, copy this hosts file from your computer to your Android device. Note the file path.

3. On your Android, open the file manager in your device and copy the hosts file to /etc or /system/etc. Accessing this location may require you to ‘allow super user permissions’ to the file manager.


4. Rename the original hosts file (if present) to a .txt or .bak extension. Paste the saved hosts file here. Reboot your Android and your Android is now ad-free.


Wrap Up

Although ads are annoying, they are also a great way to try out new apps, products or sites. Allowing non-intrusive ads is a way to be exposed to these new and sometimes great apps via ads. Alternatively many apps offers you the option to buy an ad-free version of the app, so you can support your favorite apps without being annoyed by the ads.

Enable "OK Google" Hot-word Outside Of The US [Quick-tip]

One of the best features of the new Google Experience Launcher is its support for Google Now‘s new "OK Google" hot-word. The hot-word lets you open Google Now’s voice assistant feature by simply saying "OK Google" to your Android device while on any one of the home-screens.


There have been complaints about how this feature is not available, by default, to users outside of the US. However, the "OK Google" hot-word isn't actually disabled according to region and can be easily enabled in just two steps.


How To Enable "OK Google"

Firstly, take note that the hot-word only works with the Google Experience Launcher. If you’re not using a Nexus 5, check out how to get the Google Experience Launcher on your Android 4.4 device.

Secondly, the hot-word only works with the US English voice input. So, if you’re outside of the US but want to use the hot-word, you have to change the language of your voice input.


To do this, go into Settings > Language & input. Scroll down and tap on Voice Search. You’ll see your currently selected voice input language at the top of the list of settings. Tap it, go into English… then select English (US).


Once you've done that, go back into the Language & input settings menu, then enter Voice Search again. You should now see an extra option that wasn't there before, Hot-word detection. Enable this and you’re good to go.


10 Useful Android Tips And Tricks You Should Know

Whether you are new to Android and eager to try out every available option you see on the screen, or familiar with the system, including the annoyances that plague you on a daily basis, tips and tricks to get around a system is always helpful. We are here to help you with that.


In this post, we are featuring 10 useful Android tips and tricks that may improve your experience while using your Android device. Do note that the steps may vary a little from one Android phone to another due to the differences in the build and the OS version, but if you play around with it, the next step isn’t too far off.


1. Disable App Notifications

Bugged by annoying app notifications that just keep coming? If you don’t know already, these app notifications also drain your phone’s battery. If you want to turn them off, and you are on Jelly Bean 4.1 and above, here’s how:

On any of your unwanted notifications in your notification bar, long press on the notification for a message box to appear.
Tap on App Info > Untick Show Notifications > OK.


2. Disable Mobile Data

Whenever you don’t need to stay connected, disabling the Mobile Data can help keep your smartphone battery from draining too quickly. Turning off mobile data is as easy as:

Going to Settings > Data Usage.
Disable Mobile data by toggling the setting from ON to OFF.


3. Set Mobile Data Limit

Want to keep track of how far your usage is from your monthly mobile data limit? If you have ICS and above, there is a feature which lets you keep track of how much of the quota you have left.

Head over to Settings > Data Usage.
Set your data limit by dragging the orange line to reflect your monthly quota.
Set your data usage cycle based on when your "month" starts and ends, and you’re done.
You will be alerted once you hit the limit you have set. Note that the tracked data usage of your phone may vary slightly than your carrier’s tracking.


4. Add Multiple Google Accounts

You need a Google account to use an Android phone but did you know you can choose to run more than one Google account on your Android device. This is convenient if you use more than one account for several of your Google services. To add multiple Google accounts:

Go to Settings > Add account.
Select Google and setup your New or Existing Google account.
Once added, choose what you want to sync with the account.
Repeat all the steps above if you want to add more accounts.


5. Disable Automatic App Updates

Prefer to read through app permissions and manually pick which app updates to adopt? You can, but first you need to disable your automatic app updates. Here are the steps:

Open Play Store and head over to Settings.
Tap on Auto-update apps.
Choose Do not auto-update apps.
If you want to enable the auto updates, follow the same path and choose Auto-update apps at any time or via Wi-Fi (available for certain Android devices only).


To update your apps manually, just open Play Store, and on the main page swipe in from the left and tap on My apps. You can tap on apps with pending updates and update them manually, or if you like to update them all at once, just tap on Update All.


6. How To Check For Android System Updates

For Android users that are using stock ROM, you may want to look for new updates to your system. To check for updates:

Go to Settings > About phone/tablet.
Tap on System updates.
Tap Check now to look for system updates.


7. Changing Default Apps

If you have already set some default apps for particular tasks (e.g. using Chrome for opening web links) but wish to change this:

Go to Settings > Apps.
Swipe right and look for the All tab.
Select the app you want to remove as default.
Tap on Clear defaults.


8. Organize Homescreen Shortcuts With Folders

Once you have a lot of apps installed, your homescreen might be filled with app shortcuts. Unlike the app drawer, the apps on your home screen are not arranged alphabetically. So, you might want to create some folders for your homescreen shortcuts.

Assuming you have more than a handful of shortcuts already on your homescreen, long press on any of the shortcuts and drag it onto another shortcut.
A circle should now appear around the apps, indicating that a folder has been created.
By tapping on the newly created folder, a mini window will pop up with your apps in it.
You can drag and drop additional apps into the folder if you like. You can also rename the folder by tapping on the text area at the bottom of the mini window.


9. Disable Animations

Here’s a tip on how to make your Android device run a bit smoother: disable its animations. You will need to have access to Developer Options which can be found under Settings or About device.

Note: For some phones, you may need to go to Build number and tap on it repeatedly until you see "You are now a developer!". Developer options are now enabled.

Under enabled Developer options, look for Window animation scale, Transition animation scale, and Animator duration scale. Then, turn them off (disable) them one at a time.


10. How To Turn Off Auto-Correction

Hate the fact that your phone is going English teacher mode on you? Turn off auto-correction for peace of mind when texting.

Go to Settings > Language & input.
Tap on the settings icon next to the keyboard that you are using, e.g. Google Keyboard.
Look for Auto-correction and tap on it.
Select Off to turn auto-correction off.


Saturday, 7 June 2014

How To Change the Boot Order in Your Computer’s BIOS


The boot order in your computer’s BIOS controls which device it loads the operating system from. Modify your boot order to force your computer to boot from a USB drive, CD or DVD drive, or another hard drive.

You may need to change this setting when booting from another device, whether you’re running an operating system from a live USB drive or installing a new operating system from a disc.

Note: This process will look different on each computer. The instructions here will guide you through the process, but the screenshots won’t look exactly the same.


Access the BIOS

To access the BIOS, you’ll need to restart your computer and press a specific key at the start of the boot process. This key is generally displayed on-screen during the boot process. For example, you may see a message that says “Press <DEL”> to enter setup” or “Press F2 to access the BIOS.” Press the required key at the correct time and your computer’s BIOS will appear.


While Delete and F2 are probably the most common keys, your computer may require another key, such as F1, Escape, or Ctrl+Alt+Escape. If you don’t see the required key on-screen, consult your computer’s manual or search for your computer’s model name and “bios key” on Google.

(If you built your own computer, consult the motherboard’s manual instead.)


Locate the Boot Options

Once you’re in the BIOS, look for some sort of “Boot” option menu. If you’re lucky, there will be a tab at the top of the screen named Boot. If not, this option may be located beneath another tab.


Use the arrow keys to navigate through the BIOS. To select something, press Enter. You’ll generally see a list of the keys you can use at the bottom-right corner of your screen.


Change the Boot Order

Locate the boot order screen that lists the boot devices. This may be on the Boot tab itself or beneath a Boot Order option.


Select an option and press Enter to change it, either to disable it or specify another boot device. You can also use the + and keys to move devices up or down in the priority list. (These steps may be slightly different on some computers; consult the list of keyboard shortcuts on your screen.)


Note that “USB drive” doesn’t appear as an option in the list, even though our computer has USB ports. If we connected a USB device to the computer before starting our computer and accessing this screen, we’d see the USB drive option in the list. Some computers display the USB drive option even when a drive isn’t connected, while some don’t.

The boot order is a priority list. For example, if “USB drive” is above “hard drive” in your boot order, your computer will try the USB drive and, if it’s not connected or no operating system is present, boot from the hard drive.


Save Your Settings

To save your settings, locate the Save & Exit screen. Select the Save Changes and Reset or Save Changes and Exit option and press Enter to save your changes and restart your computer.

You may also be able to press a specific key to save your settings and reset the computer. Ensure you select the “save and exit” option, not the “discard changes and exit” option.


Once your computer restarts, it will boot using your new boot order priority.


Bonus : Using A Boot Menu

To reduce the need to change your boot order, some computers have a Boot Menu option.


Press the appropriate key – often F11 or F12 – to access the boot menu while booting your computer. This allows you to boot from a specific hardware device once without changing your boot order permanently.


Most new computers will soon be using UEFI instead of the traditional BIOS, but PCs with traditional BIOSes will be with us for a long time to come. While different computers use different BIOS keys and have different BIOS layouts, the process is similar on all computers using the traditional BIOS.

How to Make a Bootable USB

Have an old USB drive lying around that you don't use anymore? Turn it into an operating install disk for Windows, Linux or Mac, or a diagnostic tool for your PC. Follow this guide to learn how.


1. Open the Command Prompt. You will need to run Command Prompt as an Administrator. Right-click on it and select Run as Administrator. You may need to enter the Administrator password.
  • This method will create a USB drive that is bootable. You can then copy the contents of an operating installation disc onto the drive to create a portable installation drive.
  • This method only works in Windows Vista, 7, and 8 and might work on Windows XP.


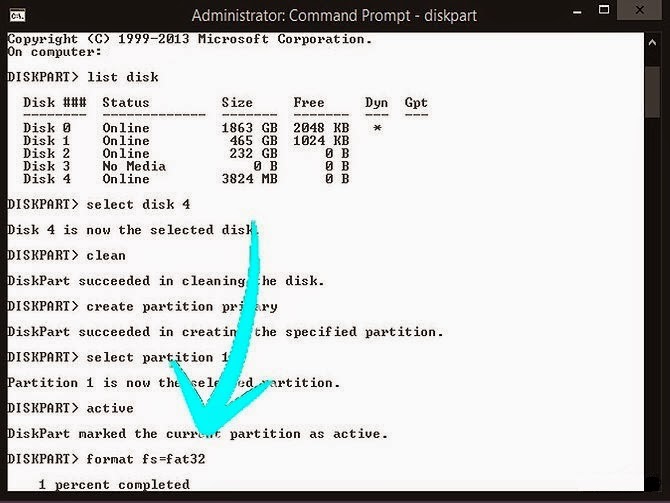
2. Open the disk management utility. This can be opened by entering the command diskpart.


3. Display the connected disks. Type the command list disk to show a list of all the drives connected to your computer. Your USB drive should be listed here as well. Make note of the number next to your USB drive.


4. Select the USB drive. Enter the command select disk #, replace “#” with the number from the previous step.


5. Clean the flash drive. Enter the command clean to have the disk management utility verify the integrity of the USB drive, and erase all data.


6. Create a bootable partition. Once the USB drive is clean, type in create partition primary. You will see a message saying that the operation was successful.


7. Select the new partition. Enter the command select partition 1 and press Enter. Once you receive a confirmation message, type active and press Enter. This will activate the partition.


8. Format the USB drive. Input the command format fs=fat32. When you press Enter, the program will work for a few minutes (if it is a small USB, e.g. 32Gb could actually take hours to SLOW format), and the progress will be displayed as a percentage.


9. Assign the USB a drive letter. Enter the command assign to give the thumb drive a letter designation. Type exit to end the disk management program.


10. Copy the operating system. Once the USB drive has been made bootable, you can copy over the installation files for the operating system you want to install. You can do this by dragging and dropping using your preferred file manager/explorer.
  • Copy over any drivers you might need during the operating system installation to make the process much smoother.