Showing posts with label Windows XP. Show all posts

Saturday, 7 June 2014

How To Change the Boot Order in Your Computer’s BIOS


The boot order in your computer’s BIOS controls which device it loads the operating system from. Modify your boot order to force your computer to boot from a USB drive, CD or DVD drive, or another hard drive.

You may need to change this setting when booting from another device, whether you’re running an operating system from a live USB drive or installing a new operating system from a disc.

Note: This process will look different on each computer. The instructions here will guide you through the process, but the screenshots won’t look exactly the same.


Access the BIOS

To access the BIOS, you’ll need to restart your computer and press a specific key at the start of the boot process. This key is generally displayed on-screen during the boot process. For example, you may see a message that says “Press <DEL”> to enter setup” or “Press F2 to access the BIOS.” Press the required key at the correct time and your computer’s BIOS will appear.


While Delete and F2 are probably the most common keys, your computer may require another key, such as F1, Escape, or Ctrl+Alt+Escape. If you don’t see the required key on-screen, consult your computer’s manual or search for your computer’s model name and “bios key” on Google.

(If you built your own computer, consult the motherboard’s manual instead.)


Locate the Boot Options

Once you’re in the BIOS, look for some sort of “Boot” option menu. If you’re lucky, there will be a tab at the top of the screen named Boot. If not, this option may be located beneath another tab.


Use the arrow keys to navigate through the BIOS. To select something, press Enter. You’ll generally see a list of the keys you can use at the bottom-right corner of your screen.


Change the Boot Order

Locate the boot order screen that lists the boot devices. This may be on the Boot tab itself or beneath a Boot Order option.


Select an option and press Enter to change it, either to disable it or specify another boot device. You can also use the + and keys to move devices up or down in the priority list. (These steps may be slightly different on some computers; consult the list of keyboard shortcuts on your screen.)


Note that “USB drive” doesn’t appear as an option in the list, even though our computer has USB ports. If we connected a USB device to the computer before starting our computer and accessing this screen, we’d see the USB drive option in the list. Some computers display the USB drive option even when a drive isn’t connected, while some don’t.

The boot order is a priority list. For example, if “USB drive” is above “hard drive” in your boot order, your computer will try the USB drive and, if it’s not connected or no operating system is present, boot from the hard drive.


Save Your Settings

To save your settings, locate the Save & Exit screen. Select the Save Changes and Reset or Save Changes and Exit option and press Enter to save your changes and restart your computer.

You may also be able to press a specific key to save your settings and reset the computer. Ensure you select the “save and exit” option, not the “discard changes and exit” option.


Once your computer restarts, it will boot using your new boot order priority.


Bonus : Using A Boot Menu

To reduce the need to change your boot order, some computers have a Boot Menu option.


Press the appropriate key – often F11 or F12 – to access the boot menu while booting your computer. This allows you to boot from a specific hardware device once without changing your boot order permanently.


Most new computers will soon be using UEFI instead of the traditional BIOS, but PCs with traditional BIOSes will be with us for a long time to come. While different computers use different BIOS keys and have different BIOS layouts, the process is similar on all computers using the traditional BIOS.

How to Make a Bootable USB

Have an old USB drive lying around that you don't use anymore? Turn it into an operating install disk for Windows, Linux or Mac, or a diagnostic tool for your PC. Follow this guide to learn how.


1. Open the Command Prompt. You will need to run Command Prompt as an Administrator. Right-click on it and select Run as Administrator. You may need to enter the Administrator password.
  • This method will create a USB drive that is bootable. You can then copy the contents of an operating installation disc onto the drive to create a portable installation drive.
  • This method only works in Windows Vista, 7, and 8 and might work on Windows XP.


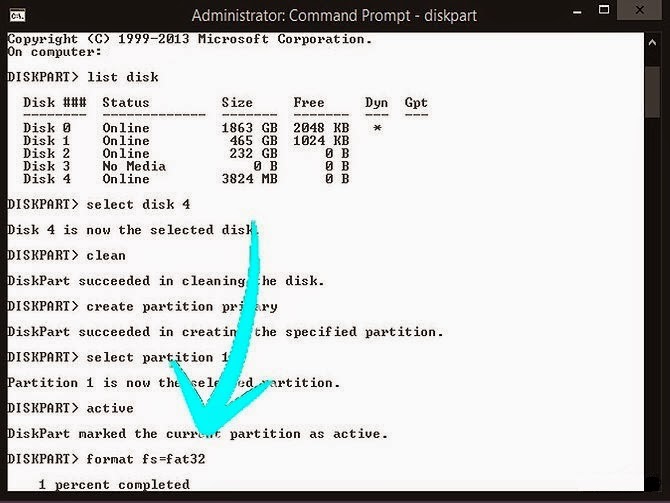
2. Open the disk management utility. This can be opened by entering the command diskpart.


3. Display the connected disks. Type the command list disk to show a list of all the drives connected to your computer. Your USB drive should be listed here as well. Make note of the number next to your USB drive.


4. Select the USB drive. Enter the command select disk #, replace “#” with the number from the previous step.


5. Clean the flash drive. Enter the command clean to have the disk management utility verify the integrity of the USB drive, and erase all data.


6. Create a bootable partition. Once the USB drive is clean, type in create partition primary. You will see a message saying that the operation was successful.


7. Select the new partition. Enter the command select partition 1 and press Enter. Once you receive a confirmation message, type active and press Enter. This will activate the partition.


8. Format the USB drive. Input the command format fs=fat32. When you press Enter, the program will work for a few minutes (if it is a small USB, e.g. 32Gb could actually take hours to SLOW format), and the progress will be displayed as a percentage.


9. Assign the USB a drive letter. Enter the command assign to give the thumb drive a letter designation. Type exit to end the disk management program.


10. Copy the operating system. Once the USB drive has been made bootable, you can copy over the installation files for the operating system you want to install. You can do this by dragging and dropping using your preferred file manager/explorer.
  • Copy over any drivers you might need during the operating system installation to make the process much smoother.

Log in Windows Lock-Screen Without Password

The purpose of this tutorial is to know the importance of physical security and how to keep us safe from these kinds of Attacks. Spying to one's PC isn't a very big deal where they even can put the spy device on your motherboard silently, again…the importance of physical security. For indivisual's  it might not be a big deal since you can carry your laptop or HDD where ever you go, but it's quite a big problem if it was a firm or office where they have a lot of important data on employees computer.


What Wikipedia says about Physical Security:

Physical security describes security measures that are designed to deny unauthorized access to facilities, equipment and resources, and to protect personnel and property from damage or harm (such as espionage, theft, or terrorist attacks).

Physical security we talked in this tutorial is part from Information Security where according to Wikipedia:

Information security, sometimes shortened to InfoSec, is the practice of defending information from unauthorized access, use, disclosure, disruption, modification, perusal, inspection, recording or destruction. It is a general term that can be used regardless of the form the data may take (electronic, physical, etc…)

Remember: Do this at your own Risk and on your own computer/laptop, make sure you're not harming the others.


Requirements:


2. USB stick (the Kon Boot file size is about 5-6MB so you can calculate by yourselves)


Steps:

1. First, we will make the Bootable Kon Boot by using the default Kon-boot installer that already provided when we buy this program, but if we use the free version, we need to create the image ourselves. If you Don't know how to make a Bootable USB [Click Here] to See our Guide on How to create a Bootable USB.


Choose the USB we want to use to install kon-boot from the "available USB drives" drop down list and click "Install to USB stick" when finished.


The installation process will take approximately 1 minute.

Note: Make sure you choose the correct USB, because the installation process will erase all data on your USB device.

2. The Kon-boot USB now ready, we need to configure the BIOS settings to change the boot order to boot from USB. If you Don't know how to change Boot order in BIOS, Follow this Tutorial [Click Here].

3. This is the preview when we successfully boot from Kon-boot USB.


4. After the Kon-boot initialization screen, it will normally boot the Windows. When we press the SHIFT key 5 times (sticky keys), we can see the command prompt pooped out with system role.


5. We can enter Windows without a password, just click the arrow and we already inside the system.


How to Prevent these types of Attacks:

1. Create a password for our computer BIOS.


2. Lock our computer physically to prevent someone open the computer case and reset the BIOS password.