Showing posts with label Android How-To Guides. Show all posts

Tuesday, 10 March 2015

Android Tutorial 2: Managing Your Installed Applications


Our first real stop on the road to mastering Android is to help you understand how to manage and organize your installed applications, deal with settings and permissions, or get rid of applications you don’t want.

Managing your applications means not allowing your apps get the most of your system. Sometimes things get a little haywire and we install a whole bunch of stuff that we probably don’t even use. Not only can that make your app drawer and home screen(s) look cluttered and confusing, but all those apps take up space. That said, if you want to keep everything you install, you can take definitive measures to streamline and make things look more organized.

We also discuss managing your account from Google Play. You may not know that much about app permissions, so we’ll explain that, and we’ll also explain how to turn auto-updates off.

Finally, we’ll actually dig deep into the application settings to show you the amount of power that Android gives you over your apps. There’s so much there that you probably don’t know even know about. You can force apps to stop, clear out the data cache, and other useful stuff.

Let’s start off our discussion of shortcuts and all the ways you can use them to better manage your Android apps.


Shortcuts

You are probably quite familiar with shortcuts, or at least the concept. Shortcuts are also called “symbolic links” and basically all that means is that you can open an application using a symbol that links to the actual program. All the icons you see in your app drawer and on your home screens are shortcuts. The actual programs are stored elsewhere on your device, you simply use shortcuts so that you can have access to your stuff without creating many copies of it.

Dragging shortcuts from the app drawer to the home screen
You can quickly create shortcuts on your home screens. First open the app drawer, then touch and hold the app you want to pin. The app drawer will fade from view and you will see you home screen.

Drag the shortcut to the screen edge if you want to place your shortcut on a different home screen.


Once you’ve chosen where you want to place the shortcut, simply release your finger.


Google Now

Google Now is sort of a personal digital assistant that learns your preferences, likes, and habits, and helps make recommendation on the information that it collects on you. Google Now, and the applicable Google Now launcher, comes included with some Android handsets. For others, it is a downloadable feature you can get in the Google Play store.
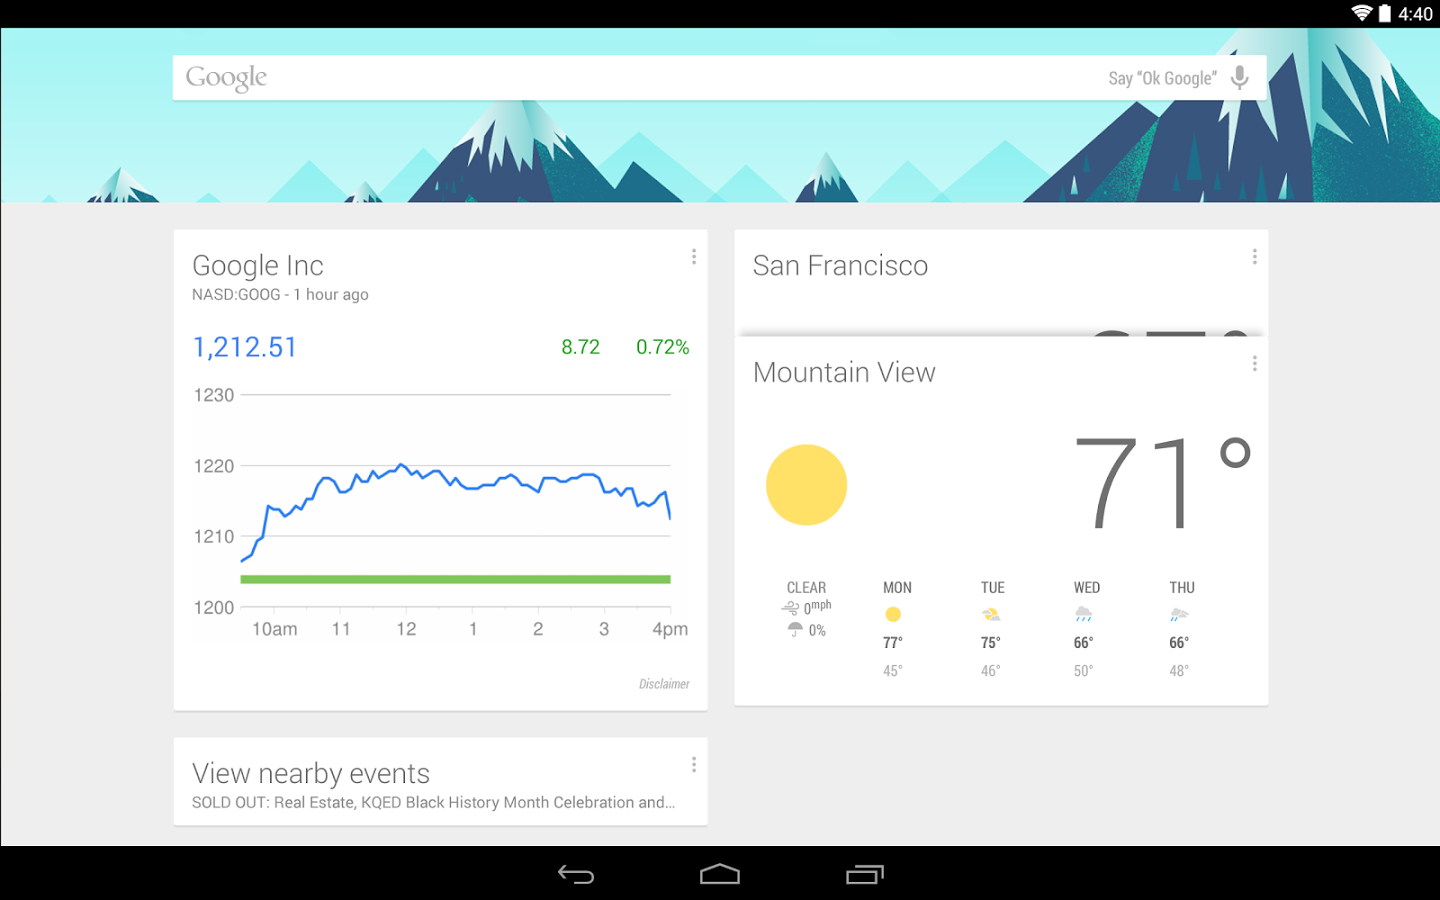

We mention this because if you install the Google Now package and use the launcher, instead of the old five home screen design many are accustomed to, you now have one main home screen. You can create subsequent home screens to the right, but Google Now is always accessible on the adjacent screen left of the main home screen. You cannot have home screens to the left of your main one so if you aren’t happy with this arrangement, you can revert to old style using the “Home” settings.


Note, the options available to you may be different than what you see here.

If you’d like to install Google Now on your Samsung device you should check out this article.


Arranging shortcuts

If you simply want to rearrange shortcuts so they’re in a certain order, then you can easily move them around. Simply choose the shortcut you want to move. In the following example, we choose the “Drive” shortcut. We press and hold and see that the “Drive” shortcut’s outline can be seen where it will be placed if you were to release it at that moment.


If you want to move a shortcut to where another shortcut already resides, simply “nudge” the one you want to supplant out of the way. As you can see, the “Facebook” shortcut moves to an open spot when the “Drive” shortcut is placed there.


Removing shortcuts

To remove shortcuts from your home screen, simply press and hold the one you want to delete, and then drag it to the X to “Remove.”


Creating shortcut groups

Shortcut groups are a great way to clean up similar types of shortcuts and place them in a group. When you tap on the group, it will expand open and you can pick the app you want to launch, kind of like having mini app drawers on your home screen.

To create a shortcut group, you must have at least two shortcuts you want to group. In this example, we’ll take all the Google apps and group them in a shortcut group. First we drag one shortcut over the top of another and release it when a white halo appears around the bottom shortcut.


You’ll then see that it forms a group, which you can then add more apps to and then move around and order as you see fit.

You can also give the group a name by tapping on “Unnamed Folder,” the system will allow you to personalize it. In the following example, we give our new Google group the apt name “Google.”


Grouping apps in the App Tray

Grouping apps in the app tray works the same as any other app group you’d form only this group will be persistent across all your home screens and thus always within reach of your thumb tips.


To create a group in the app tray, follow the same procedure as outlined above, only drag your apps to the tray instead of the home screen.


You can also rename the group to something appropriate.

Note on the Samsung interface, you can tap the menu button and then “create folder” to accomplish the same thing as app groups on Android.


Google Play or The Play Store

Google Play is Google’s app store, with over one million apps as of July 2013, you’re sure to find something you need. For every iOS app out there, there is almost always an Android equivalent. When you first open the Play Store, it will display categories of apps you can download, Play favorites, and more. You can search for any specific app by clicking on the search icon.


Next Page : Managing Installed Applications and Permissions


Sunday, 8 June 2014

How To Block Ads In Android Apps, Games And Browsers

Ads are a necessary evil. Many websites and applications are providing you with free service, free content and free software because someone else is paying them to keep them up. Thus, the service provider has to serve ads to you in return for the income that is keeping them in business, and in development. As the user, you reap the benefit of using the product for free.


However, sometimes the ad placements can be really annoying, contributing to not-so-appealing user experience. In this post we will look at methods to block ads from showing up on Android. You can block ads from appearing in apps and games, or only on browsers.

The methods here may work for both rooted and non-rooted devices. It will be specified for each method. Before we begin, you need a File Manager, e.g. Astro File Manager. Any other file manager will work fine.

Disclaimer: Attempt ad-blocking at your own risk. We cannot be held responsible for any effects on your device resulting from these methods.


1. Adblock Plus (ABP)

This method uses ad-blockers (apps) to block all ads in your device, including the ads shown in various apps and games. There are many ad-blockers for Android, thanks to the ever-growing Android developers. The top two would be Adblock Plus (ABP) and AdAway; we wil discuss the former, but you can install AdAway if that’s your preference.


Using Adblock Plus

We’re going with Adblock Plus as it is an open source project and has the option to allow non-intrusive ads. This method works for both rooted and non-rooted devices. Installing an ad-blocker app requires your device to allow applications from unknown sources.

Sideloading is required as Google has removed ad-block apps from Google Play Store. You need to sideload any ad-blocker, i.e. install ad-blockers using its APK file and not from Google Play Store.

Follow the given steps to set this configuration:

Go to Settings > Applications (or Security on 4.0 and above) on your Android device.
Navigate to the Unknown sources option.
If unchecked, tap the checkbox, and then tap OK on the confirmation popup.
Your Android device is ready to install ad-blockers.


Installing And Configuring Adblock Plus

1. Open a browser in your device and download Adblock Plus for Android. Your device will receive the APK file: adblockplusandroid-version.apk.

2. Navigate to where your downloaded files are kept, then tap on the file and install. (If you open the APK file using a file manager, select Open App Manager and then click on Install.)

3.1 On rooted devices: after installing, open Adblock Plus. It will request for super user permissions. Allow super user permissions to Adblock Plus and you are good to go.

3.2 On non-rooted devices: you need a few more steps, to manually set up proxy in your Android. You will need to follow the instructions here as instructions are different for Android versions up to 3.1 and 4.0+.s

Now Adblock Plus will start blocking ads. You can set more options in Adblock Plus like ads filter lists, non-intrusive ads, etc in Settings.


Adblock Plus – Browser Extension

Adblock Plus is also available as a browser extension for Firefox. With this method, only the ads shown on web pages inside the browser are blocked. Ads in apps or games are not affected. This method works for rooted as well as non-rooted devices.


Setting Up Adblock Plus (Extension)

1. If you are not using Firefox as a browser on your Android yet, get it here. Run the browser on your device and go to the Adblock Plus add-on here. Add it to Firefox and Install it.

2. Restart Firefox and browse ad-free. You can set more options in Adblock Plus by going to the Menu > Adblock Plus and going through the options you can configure.

2. Block Ads Using ‘Hosts’ File
This method uses ‘hosts’ file to block ads. This method blocks all ads in your device, including the ones shown in various apps and games. This method works only for rooted devices.


What Is A ‘Hosts’ File?

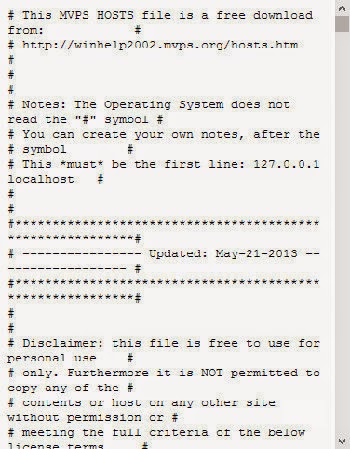
hosts’ file is a plain-text file in an operating system to map hostnames (like anything.com) to its IP address. Whenever you try to launch a website using its hostname, the operating system will usually search the ‘hosts’ file to find the corresponding IP address first.

If the search is successful, then its mapped IP address is used; otherwise a query is sent to DNS (Domain Name Service) to find the IP address of that hostname.


Setting Up ‘Hosts’ File

1. On the computer, open MVPS (or pgl.yoyo.org or hostfile.mine.nu) on your browser. A plain-text page will open. Save this page as the name hosts in the computer.


2. Using Bluetooth or a USB connection, copy this hosts file from your computer to your Android device. Note the file path.

3. On your Android, open the file manager in your device and copy the hosts file to /etc or /system/etc. Accessing this location may require you to ‘allow super user permissions’ to the file manager.


4. Rename the original hosts file (if present) to a .txt or .bak extension. Paste the saved hosts file here. Reboot your Android and your Android is now ad-free.


Wrap Up

Although ads are annoying, they are also a great way to try out new apps, products or sites. Allowing non-intrusive ads is a way to be exposed to these new and sometimes great apps via ads. Alternatively many apps offers you the option to buy an ad-free version of the app, so you can support your favorite apps without being annoyed by the ads.

Enable "OK Google" Hot-word Outside Of The US [Quick-tip]

One of the best features of the new Google Experience Launcher is its support for Google Now‘s new "OK Google" hot-word. The hot-word lets you open Google Now’s voice assistant feature by simply saying "OK Google" to your Android device while on any one of the home-screens.


There have been complaints about how this feature is not available, by default, to users outside of the US. However, the "OK Google" hot-word isn't actually disabled according to region and can be easily enabled in just two steps.


How To Enable "OK Google"

Firstly, take note that the hot-word only works with the Google Experience Launcher. If you’re not using a Nexus 5, check out how to get the Google Experience Launcher on your Android 4.4 device.

Secondly, the hot-word only works with the US English voice input. So, if you’re outside of the US but want to use the hot-word, you have to change the language of your voice input.


To do this, go into Settings > Language & input. Scroll down and tap on Voice Search. You’ll see your currently selected voice input language at the top of the list of settings. Tap it, go into English… then select English (US).


Once you've done that, go back into the Language & input settings menu, then enter Voice Search again. You should now see an extra option that wasn't there before, Hot-word detection. Enable this and you’re good to go.


Saturday, 7 June 2014

How To Speed Up Your Android Chrome Browser [Quick-tip]

When you’re using the Android version of Google Chrome, you probably have experienced the time when Chrome takes way too much time to load, or crashes frequently, or acts sluggish when scrolling.


If you are used to Chrome and don’t want to opt for another browser for all your online needs, here is a quick-tip to speed up your Android Chrome browser. Using this tip will significantly improve your scrolling experience and it will reduce frame rate drops.


Speed Up Your Chrome Browser

Start by opening the Chrome browser app on your Android. Go to the address bar. Type Chrome://Flags in the address bar and then press Enter.


You will be redirected to the Chrome://Flags settings page. Next, look for the flag called “Maximum tiles for interest area Mac, Windows, Linux, Chrome OS, Android”.


Tap on default and choose 512 from the drop-down. If your device has less than 512 RAM, its best that you choose anything below that figure to prevent Chrome from taking over all of your device’s memory.


Tap on the relaunch button at the bottom and you’re done.

If you want to go back to the default settings, head back to the Chrome://flags page and “Maximum tiles for interest area Mac, Windows, Linux, Chrome OS, Android” then choose default. Relaunch your Chrome browser for the effect to take place.

Top 5 Free Android Apps To Download And Play Music

Whether you’re working, taking a break in the park or preparing an awesome meal, listening to some tunes while you’re getting things done makes the task a lot easier and fun. There are plenty of ways to get a hold of music for listening on your Android device, but if you’re really looking for one that is free to add to your own playlist or maybe you want some background music for your next Instagram video, we have just the thing for you.


Take a look at our list of top 5 apps to search, listen to and download free music on Android. You don’t have to register an account for any of these apps to use them. And the songs come from multiple sources so you probably can find tunes that are right up your alley. If you don’t have the time to transfer your music from your PC to your Android device, these apps may be your best bet for downloading them on-the-go.


1. Free Music Download

Free Music Download is an app with a clean and straightforward design. Once launched you have two options, search and files. The search option allows you to search for any songs related to a keyword whereas the files option features all the songs that you’ve downloaded using the app.

You can also use the downloaded songs and set them as ringtones, alarms or notification alerts from within the app. Free Music Download uses SoundCloud as its source.


2. Music Search

Music search is an easy-to-use app capable of searching and downloading free music on your Android device. To download the song you like, all you need to do is tap the song on the search results then tap the Download button at the bottom. You can even listen to it without having to download the file first.


The downloaded song can then be accessed easily under the app’s library tab. There, you can preview the progress of downloads as well as look at the list of your downloaded songs. Besides that, you can set any of the songs as a ringtone from within the app as well.


3. Music Download Paradise

This app works in a similar way to the previous two. Simply search and tap on the song to preview or download it to your Android device immediately. Once downloaded, you can access the songs from the Library section in the app itself.


Music Download Paradise also includes a share option. Just tap your downloaded songs in the app and tap share. Instead of opening your music player, you can also play your songs using the app’s built-in music player.


4. Music Maniac

You can use Music Maniac to look for individual songs by tapping on the MP3 Title/Artist Search option. The download section will list all of your downloaded songs. Tap on any of them to play the song automatically on your Android’s default music player.


In case you’re wondering where the app stores your downloaded songs, look at the top right for the navicon button and tap on the View Download Location. If you want to clear your download list, you can do so from within the navicon menu as well.


5. Free MP3 Downloads

Just hit the search button from within the app to look for a song. Tapping the songs from the search results will start the download immediately. To delete a song, all you need to do is simply tap, hold the song and choose delete under the listen tab.


You can also listen to your song using the app’s music player. This app relies on the Jamendo open source API for their content, which means all the songs available through this app is free music released by the creators themselves.

Whistle To Answer Phone Calls With Auto Answer [Android]

Talking on the phone while driving is definitely not advisable, and is even illegal in some parts of the world, but there are times when you just have to take this call or launch apps while behind the wheel of a car. The danger comes in handling the phone when you should have your hands on the steering wheel, and your attention on the road.

While we wait for a sturdier built-in system for iOS and Siri users, Android users may be able to find a solution with Auto Answer.


Auto Answer is a car-mode app, with a twist. Not only does it offer a driving interface with a quick one-touch dialing interface for up to 18 of your contacts, Auto Answer also lets you answer a phone call simply by whistling. No more reaching over to swipe your smartphone to accept the call.


Getting Started With Auto Answer

Auto Answer will run on any Android version above 2.3.3, so you shouldn’t have any problems with compatibility as long as you’re running a relatively recent Android smartphone. The first time you run the app, you will be bombarded with information on what to expect from Auto Answer.

It is recommended that you go through the displayed information to familiarize yourself with what the app can do.


Once you’re done, tap on the big green Go button at the bottom and you’ll be taken to the app itself.

The first thing you’ll see is a pop-up window asking you if you want to enable the whistle-to-answer feature, plus how long before the app silences the incoming call. Don’t worry about your choices here, as you can change them later.


There are more features in the main menu to further customize your usage.


Using Auto Answer

Auto Answer is a pretty streamlined app designed to do one particular thing, but there’s still a reasonable number of options at your fingertips within the app. Here’s a quick run through Auto Answer’s main features.

Driving Mode Dialer
Auto Answer has two types of Driving Mode dialers: one that will give you one-touch access to up to 18 contacts, and another for up to 9 of your favourite applications.

To enable Driving Mode and access these dialers, tap on the icon to the right of the Driving Mode dialer text on the app’s main screen. This will bring the app into Driving Mode, and give you access to the dialers.


The first time you enter Driving Mode, the contacts dialer will offer to automatically add contacts to the dialer, based on your most frequently called contacts.

If you want to add contacts yourself, just tap on the Edit checkbox in the upper right to enable editing mode. In this mode, the circles will turn to gold, and you’ll be able to add or remove contacts as you see fit. The same applies to the app dialer.

The Force screen on option is there if you want the dialer to keep your smartphone’s screen on, for instance, if you’re waiting for an incoming call. There’s also an option in the Settings sceen to automatically enable Driving Mode when connected to a Bluetooth device.


Whistle To Answer

The main highlight of Auto Answer is the whistle-to-answer feature. To enable this feature, just tap on the switch to the right of Answer to incoming call by whistling on the app’s main screen. This will enable the whistle-to-answer functionality of the app.

Note that the app will also automatically enable your speakerphone if you answer a call by whistling.

To tweak the functionality of this feature, you’ll need to go into the Settings screen. Scroll down until you find the section that has to do with this whistle-to-answer feature:


Here, you can change the amount of time before your ringtone is silenced as well as choose between five levels of whistle detector sensitivity.

You can also set whether this functionality only activates during Driving Mode and whether to disable noise cancellation.


Automatic SMS Scheduling

Auto Answer can also be used to schedule and automatically send SMSes when you’re not available. Just tap on the switch to the right of the Schedule automatic SMS setting and you’ll be taken to the Schedule automatic SMS settings screen.


Here, you can define an end time for the automatic SMS function, choose recipients and the content of the SMS. The SMSes can be sent to all incoming calls, numbers in the contact list, numbers not in contact list or a specific contact.

You also have a number of choices for the text you want to send in these automatic SMSes, but note that the free version doesn’t let you edit these messages.


There’s also another automatic SMS-related options in the app’s main Settings screen. Here, you can enable an option to prompt you about enabling automatic SMS every time your smartphone is switched to silent mode.


Conclusion

Auto Answer isn’t the most feature-rich Android app you’ll find, but then it doesn’t have to be. It was designed to be a car-mode app with some additional hands-free functionality, and as far as that is concerned, it’s quite a capable app. The basic app is free, but there’s also a Pro version that removes ads and lets you edit the messages for the Automatic SMS feature, amongst others. There is one drawback though: it sucks if you can’t whistle.

5 Android Screen Recording Apps To Record Your Screen Activity

From screen-casting your Android screen to an Apple TV to enabling task automation through apps, an Android device is a useful one that’s slowly becoming an essential must-have. Unfortunately, in the past, it has always been difficult to do screen recording on Android, as you’d need to get your device connected to a PC for it to work.

However, that is no longer the case, because Google now has screen recording support for the KitKat version of Android. This makes it easier for developers to create apps for native screen recording purposes.


We've done the work and compiled a list of apps that you can download to do screen recording on your Android. Try out any one of these 5 Android screen recording apps to help you record any of your Android screen activity to be saved as a video file. Do note that all of these recording apps require a rooted device to function.


1. Rec.

Rec. is an Android screen recording app with an elegant interface. Once you open the app, all you need to do is adjust the bit rate and duration according to your preference before you tap on ‘Record’ at the bottom to start.

You can also enable audio recording and even name your recording before beginning as well. Once you tap on Record, the app will start counting to 10, so that you’ll have enough time to prepare before your device starts recording.


You can stop the recording by tapping on ‘Stop’ in the app, using the notification bar, or simply by turning your device screen off. The free version limits your recording to only 5 minutes and the audio recording only lasts for 30 seconds. If you’d rather not limit yourself, you can always upgrade to the paid version within the app.


2. Screen Recorder For KitKat

This is a simple screen recording app that you can download for free through the Google play store. It includes features like setting up your preferred resolution, adjusting your bitrate, countdown and the ability to rotate the video. The app allows you to record for up to 180 seconds. You can start recording by tapping on the Record button when you’re inside the app.


While recording, you’ll be able to see your recording status via your Android notification bar. A sound and vibration notification lets you know when it has finished recording. All of the recordings will be available in your /sdcard/ScreenRecorder folder.


3. SCR Screen Recorder Free

SCR is another screen recorder app that allows you to do free screen recording for up to 3 minutes, with a watermark added to your video. The app doesn’t have a main interface. Instead it comprises of an overlay of a small rectangular box that will includes 3 buttons: one for recording, another for accessing settings, and a button to exit the app. Once you start recording, you will notice an overlay at the right side of your screen indicating that the app is currently recording.


To stop the recording, you can turn off your screen for 2 seconds or just re-open the app again. There are plenty of features you can try from the app settings page, such as choosing your video encoder, resolution, image transformation using GPU or CPU, indicating bitrate, choosing a frame rate (which is limited by hardware capabilities) and many others.


4. Screen Record (For KitKat+)

Screen Record is a screen recording app that simply allows you to decide the duration and name your recordings without any extra features. In the app, you can specify your recording duration to up till 120 seconds on the free version of this app. The app will keep on recording until that time is over once you tap on ‘Start Recording’.


Your recordings will be available in the /sdcard/ScreenRecord/ folder and there won’t be any watermark added to any of your videos. You can also opt for the paid version if you’re interested in increasing the 2 minute limit into a maximum of 10 minutes of recording at a time.


5. Shou

Although Shou is still in its beta phase, this app promises a lot of features that most recording apps currently don’t offer. You can use Shou to do screen recording with stereo sound, mirror your device screen to any Miracast or AirPlay enabled devices, and even take a screen shot simply by shaking your Android device. You need to join their Google+ community before you can download the app from the Play Store.


There are no time limits on a recording using Shou. You can select your source engine, encoding engine, orientation, resolution, bitrate and it also enables you to show touches all from within the apps video settings page. Don’t be afraid of the number of permissions it requires, as the app carries a lot of other features that requires such permissions.


How to set Internet Data Limit on Android Phones and Tablets

Android has a habit of running services in the background which can consume a lot of data. If you are on a limited data pack, here's what you can do so as not to cross your allotted usage.


Big internet bills can be a pain, especially when it comes to Android (which has tons of applications that keep using web services in the background). You cannot stop these applications from doing so unless you don't uninstall them completely. But the good thing about Android is that you can set monthly limits to your data usage to avoid crossing your mobile data usage. And hence you can save money!

Once enabled, you will get a warning when you are near your limit. And once you reach the limit, cellular data is completely turned off. Wi-Fi is not affected and if you want you can re adjust the limits according to your will.

Here’s what you need to do:

Go to the settings menu by selecting the settings icon from your applications.


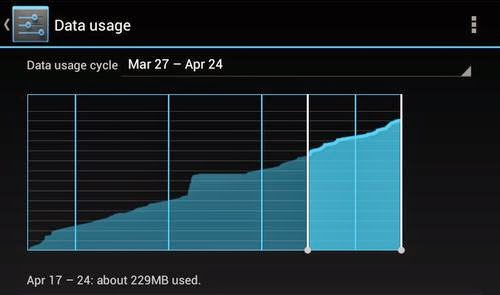
Select the “Data Usage” tab from the screen. You’ll first have to enable mobile data to set limits since you are going to set limits on mobile data only. As soon as you do so, you’ll see a screen like this:


Two markers show up on the graph below. The red line shows the limit after which all your data activities will be turned off. The orange line gives you a warning when cellular data is about to reach that limit but won't turn the data off. Next you need to check the box next to Set Data Limit to set the two limits on your screen.
It will ask you to confirm the settings and once you respond as 'OK', the OS will set these two limits.

Note: Your mobile operator might think you’ve spent more data than might be shown by the device, so set your limit accordingly.

And you can close settings now and congratulations! You just saved yourself the pain of huge bills or running out of internet data when you really need it.